Saturday

Butterfingered Chef Bag !


Hi everyone !

Today's post is short and, weirdly, not about food ! I've spend a day after Christmas having fun connecting my hobby (this blog and food) with a course I'm studying at university (costume design, which is mostly sewing).


 I made this 'Butterfingered Chef' bag ! I am so proud of it ! Hand made and hand-painted, nicely finished on the inside, has a lot of space and a zipper. I use it everyday !


In the future I'm thinking about trying to sew oven mitts and an apron and maybe some other things. I was also thinking about maybe trying to hand-paint wine glasses and plates and making some kitchen decorations etc.


 For now I am happy with just the bag cause I have too much other work to do but I have a lot of ideas for recipes, sewing and decorations ! I am so inspired !


Hope you had great Christmas ! 

Butterfingered Chef


Sunday

Plain, Almond and Peanut Butter Christmas Biscuits


Busy, busy, busy. Little elves are running up and down, worrying if they'll manage to finish up all the toys for good children. I am as busy as they are. I've spend a whole day baking star-shaped biscuits in 3 different flavours : plain, almond and peanut butter. The oven has been working all day long without a break and it's proud of what it achieved !
These biscuits are great for getting your family in a christmas mood. They can also be used as a beautiful and edible decoration for your Christmas tree ! Come on ! No time to waste; heat up your oven and let's get this baking started !


Ingredients : Plain Biscuit

- 250g plain flour
- 125g demerara sugar
- 125g softened butter

- 1 roughly beaten egg

Ingredients : Almond Biscuit

- 250g plain flour
- 125g caster sugar
- 125g softened butter
- A tsp of vanilla powder
- A handful of almond sticks
- 1 roughly beaten egg

Ingredients : Peanut Butter Biscuit

- 250g plain flour
- 125g demerara sugar
- 125g softened butter
- 2 tsp of peanut butter
- 1 roughly beaten egg
- black sesame seeds to sprinkle on top


All the flavours follow the same pattern. First, you beat the butter with sugar in a bowl. Then you beat in the egg and the flavouring (vanilla/almonds/peanut butter). Next it's the time for flour. I find it easier when I add the flour bit by bit and also mix it in with my hands. When the dough becomes fairly soft put it onto a floured surface and knead it gently until smooth. Wrap it in a cling film and put it in a fridge for 1,5h-2h to cool.

Heat up your oven to 170°C with a fan. 

On a lightly floured surface roll the dough so it's 0.5cm. Use your cookie cutters to cut out shapes from the dough. Decorate with anything you want but I personally prefer simple almond sticks or almond flakes sprinkled with sugar. Lay the biscuits on a sheet of baking paper that you previously laid on a baking tray. Bake it in the oven for around 8 minutes. Keep checking on the biscuits. They should be ready when the sides are turning golden.

Take them out and let them cool down. They're ready !

If you want the biscuits to also be a decoration for your Christmas tree simply make a small hole on top of a biscuit with an end of a paintbrush. A ribbon will fit through there perfectly. Just tie it and it's ready to hang on your Christmas tree !

I just realised it's 3 a.m where I live and with the last tray of biscuits I also realised how long I have not been sitting. My legs are dying.

I hope you'll like this recipe and have as much fun making those delicious biscuits as I did !


Merry Baking from,

Butterfingered Chef !


Friday

Homemade Christmas Muscovado Biscuits

Ho Ho Ho Everyone ! Well, not Ho Ho Ho yet but it's time to start getting ready for Christmas ! Many people are walking around wondering what to buy for their loved ones and find it very difficult. Well, let me make it easier for you. Christmas is about love and spending time with your family and what would ever be a better gift than spending time and energy and putting in all your love in making delicious homemade Christmassy biscuits. Yes ? Great ! Let's start baking ! 


Ingredients :  

- 2 teaspoons baking soda
- 1/2 teaspoon ground cloves
- 2 1/4 cups all-purpose flour
- 1/2 teaspoon ground allspice
- 1 teaspoon ground cinnamon
- 1 teaspoon ground ginger 
- 1/2 teaspoon salt
- 1/4 tsp cayenne pepper
- 1/2 cup baking margarine at room temperature
- 1/4 cup unsalted butter, softened
- 1 cup muscovado sugar (buy 2x500g - the rest will go for making a sugar syrup)
- 1 large egg
- 1/2 cup of sugar syrup 
- dry demerara sugar for sprinkling the biscuits before baking
- baking sheets


Sugar syrup will take a while to make and to cool down. Prepare it before hand. What you need to do is to pour a little bit more  than 1/2 cup of water into a pot and bring it to boil. Then turn the heat to small and start adding sugar bit by bit. Keep stirring ! Your syrup is ready when no more sugar is able to dissolve.

Start of by combining dry ingredients : baking soda, ginger, cinnamon, allspice, cloves, salt, cayenne pepper and flour together in one bowl. 

In another bowl put butter, margarine and muscovado sugar. 
A tip : don't put massive chunks of butter and margarine in a bowl. Cut them in smaller pieces. If the sugar has bigger chunks in it use a hand potato masher to smash it and mix it with butter before using a mixer. 
Mix the mixture with a mixer until fluffy. It should take around 3-4 minutes. Add an egg and the sugar syrup. To avoid making a mess add the flour mixture bit by bit each time mixing it in with a fork. This way ,when you finally use a mixer on a low speed to combine the ingredients properly together, the flour dust won't go everywhere. 

Preheat the oven to 200°C.


Take a small amount of dough in your wet hands and roll it until round and smooth. Put it on an ungreased baking sheet (place the sheet on a baking tray). Place the dough balls around 4-5cm (aprox. 2 inches) apart from each other. Sprinkle some dry demerara sugar on top of the dough balls. 


Now here comes a tricky part. When I was making my biscuits I had to "feel" my oven. Some of my biscuits burned a little bit when on a certain tray. I had to figure out if they come out better when baked 8, 10 or 12 minutes. Also an important role plays the position you place them in the oven. For me the biscuits came out the best when baked on a teflon baking tray on a top rack  for 8 minutes. I suggest you make sample biscuits and 'feel' the oven. 


After the baking time take the biscuits out and cool them down. They may feel a bit soft 

when straight out of the oven but do not worry they get crunchy when they cool down. 

Now the only thing left to do is figuring out how you want to wrap them up and putting them under a Christmas tree !


I hope you and your loved ones will enjoy this recipe. 


With Love, 

Butterfingered Chef


Monday

Pizza made with Love and Care


Hi ! I apologise for not posting any recipes recently but as a university student I concentrate mostly on my studies and I simply don't have much time for cooking. Well, except for today !


 My friend from my course is staying over and I want to surprise her with something delicious (besides, I myself want something that is not from a take-away), but the problem is she does not eat any vegetables and apart from that the list of what she likes is very short...

- Meat
- Chocolate
- Water
- Tea
- Mushrooms
- Tomato if they're a sauce
- Raw Peas
- Potatoes (as chips and crisps)
- White Wine
- Bread
- Cheese

... and that's more or less about it. From this list I see only a couple of options and because it will be a girly night with movies and probably sewing (we're studying Costume Design and our Final Crit is coming to us with big steps) I decided to make a Mighty Meaty Pizza with Mushrooms and Chocolate Muffins. Also another friend of mine is coming and he doesn't eat pork so ham and pepperoni cannot make an appearance on the pizza. Let's get it started !

For a muffin recipe click here http://butterfingered-chef.blogspot.co.uk/2013/09/quick-easy-and-delicious-muffin-recipe.html 
To make a fully chocolate muffin melt chocolate and add to the mixture.


Ingredients for the pizza : 

- Slices of beef
- Champignons
- Cheddar Cheese
- 7g of Dried Yeast
- Tbsp of Sea Salt
- Tbsp of Golden Caster Sugar
- 1kg of Strong Bread Flour
- Lukewarm Water (650ml)
- A can of Peeled Tomatoes
- Oregano
- Pepper
- Sugar
- Damp Cloth

Start of by pouring lukewarm water into a large bowl. Slowly add yeast, caster sugar and sea salt while stirring with a fork. Add flour in small amounts. Keep stirring. Keep adding the flour until it creates a spongy dough. On a dusted with flour surface knead the dough with your hand until smooth. Put a dough into a flour-dusted bowl and cover it with a damp cloth (the cloth should touch the dough). Keep it in a warm room until the dough doubles in size. It can take around 30-40 minutes for the dough to expand. Pour the can of peeled tomatoes in a small pot and cook it on a medium heat. Add in normal white sugar, pepper, salt and oregano (the measurements for this are up to you). Preheat the oven to 200°C. Dust a baking tray with flour and pop the dough in. Depending on how big is your tray and how thick you like your pizza this portion of dough can be enough for two trays of pizza. Normally you should stretch and flatten the pizza dough before popping it on a tray but for those who like really thick pizza base I suggest skipping that part. I skipped it and popped my dough straight on a tray and spread it around it with my hands. This created a very thick and delicate base. Spread a thin layer of the sauce on a pizza dough. Now add the toppings. Cheese goes first, then beef and mushrooms. On top of that add more cheese. Pop the pizza in the oven. It should take around 20 minutes for it to be ready. 

Voila ! Very thick, super delicious and as my friends described it "awesome !" pizza. A delicious way to show your friends that you truly care about them. 

I hope you'll try this recipe out and that your friends will love it as much as mine did.


With Love,

Butterfingered Chef 


Tuesday

Butterfingered Chef's Turkey Pie

Hello ! Today I want to share with you a recipe I am very proud of.  Trust me - it is simply delicious ! Crispy on the outside, soft on the inside.  Simple to make and great for a family dinner. 


Ingredients : 

- Champignons
- Bacon
- Double Cream
- Rosemary
- Minced Turkey 
- Pepper 
- Chicken Broth Cube 
- Batatas (Sweet Potatoes) 
- Olive Oil  
- Fresh Bread Crumbs 
- Garlic 
- Shortcrust Pastry Sheet


Start of by heating up an oven to 200ºC. Slice the champignons and cook on oil of olive on high heat for 3-4 minutes. Remember to wash the champignons well. Cut bacon in any way you wish (you can have small pieces but I personally liked them quite big). Add bacon to champignons and cook for another 3-4 minutes. Wash, peel and slice sweet potatoes and arrange them at the bottom of the pie dish. You want the slices to be approximately 5 mm wide.  Cut the minced turkey into big pieces and add to the pan. Cook it for 4-5 minutes on a low heat until the turkey meat goes white but is not yet cooked throughout. Season with pepper. To a small pot pour double cream, add finely chopped rosemary, freshly ground pepper and 1/5 of a chicken broth cube, stir and on a low heat cook for 2-3 minutes. Keep stirring. When it's done pour the cream over the sweet potatoes. On top of that lay the turkey/bacon/mushroom mixture. Sprinkle some fresh bread crumbs and freshly minced garlic over the whole thing. Now it's the time to make use of shortcrust pastry sheets*. After arranging the pastry cover it with a thin amount of olive oil. Put in the oven for 35-40 minutes. 


* Remember to take the pastry sheets out of the fridge 30 minutes before the cooking time. When they're cold they break. 


I hope you will like my recipe ! Leave your thoughts on it in a comment and help me improve it !  


Enjoy ! 

Butterfingered Chef 

Friday

Delicious and quick tagliatelle recipe

Uff... It's been a while since I last published anything but don't worry I am back. Today's recipe is delicious, cheap, very easy and quick to make.


Ingredients : 

Pepper
Salt
Butter
Half Fat Creme Fraiche
Olive Oil
Tagliatelle
Fresh Dill
Baby Spinach
Onion
Smoked Salmon
Mozzarella


Boil water in a pot and salt it. And 2 spoons of olive oil. When it's boiling add tagliatelle and cook for 7-9 minutes. Meanwhile chop half an onion into fine pieces and cook it until soft. Add in spinach leaves and a teaspoon of butter. When the leaves wilt season well and add creme fraiche. Simmer. Cut mozzarella into small pieces and add to the sauce. Keep stirring until it melts.  Cut smoked salmon and add to the sauce. Keep stirring. Chop fresh dill finely. Add it to the sauce and season the sauce well. Run tagliatelle through a sieve.


Put the tagliatelle on a plate and cover it with the sauce. On top of the sauce put a little bit more chopped fresh dill and voila !

Quick, easy, cheap and delicious !


Enjoy ! 

Butterfingered Chef 


Red-Capped Scaber Stalk and Penny Bun

Mushroom-picking. Depending on how one looks at it it can be a relaxing exercise or a family competition. For me it's a hobby. My grandma took me to the forest since I was very little. She would put me in my stroller and go for a walk while looking with her hawk eye for mushrooms. Each an every year when September hit the calendar me and my grandparents woke up early in the morning before the sun fell on the eyes of all the other mushroom-pickers. We dressed up quickly, drank tea, grabbed a knife and a plastic bag, put hats on our heads and rushed into the forest. Because my grandma saw how much fun it was for me to find mushrooms she would sniff around and call me saying that she can smell one around her but she can't see it. Obviously it was right there in front of her. Each and every year I got better and better at it, knowing more and more kinds and learning how to differentiate edible mushrooms from tricky poisonous ones and soon a fun walk around the forest with my grandparents changed into hobby which I could practice only once a year and for the rest of the year just eagerly wait. Unfortunately at some point the forest around my summerhouse became very dry and stopped producing a great amount of mushrooms so September walks became quite sad when we were coming back with only a couple of mushrooms in our bags. This year we've been lucky. The weather brought the forest to life. I decided to start writing about mushrooms but in sections because writing about all of them at once would be difficult.


Penny Bun belongs to the family of Boletaceae mushrooms. It grows in North America and Europe. It is often found in mountains, less often in low pressure zone. It is loved by all mushroom-pickers because of its flavour values. It is edible raw, marinated and dried out. It can grow from 5 to 20 cm tall. Young Penny Buns have a white or sand colour of the cap. The older mushrooms are light or more often dark brown. The cap is matte and the texture of it can be wrinkled. When it rains the cap becomes sticky. 


One of my favourite mushrooms Red-capped Scaber Stalk. It's stem is white with black dots and a cap is ginger/orange-red. It belongs to a mushroom family called Boletaceae. It can grow 10-18cm tall. The flesh of the mushroom becomes very dark when cooked. They have to be well cooked otherwise they may cause vomiting. 
It can also be dried and used later on during the year. It is quite common in Poland but in Germany or Holand it's on a list of endangered species. It lives in harmony with Aspen tree and can be often found under them. 


Till the next post !

Butterfingered Chef 

Monday

Quick, Easy and Delicious Muffin Recipe !


The last time I tried to make muffins nothing worked out the way I planned. Well I did not give up and I made them again. This time they came out perfect ! 
I used the same recipe as in the previous post and perfected it a bit. 

Ingredients : 

- 1 egg
- 200g plain flour
- 100g caster sugar
- 2 teaspoons of baking powder
- 120 ml milk
- 4 tablespoons olive oil
- 1/2 teaspoon salt

I also made 4 different kinds : plain, coconut, raisins and dark chocolate. 


Before I started doing anything I heated up the oven to 180°C. 
I mixed all dry ingredients in a bowl. In a separate bowl I mixed milk, olive oil and an egg. I combined the two but I tired not to over-mix it. I separated the mixture into 4 glasses. To the first one I didn't add any additional ingredients. To the second one I added a teaspoon of coconut shreds. Unfortunately it was too little and I couldn't really taste it in a muffin so I suggest using around 3 teaspoons of coconut shreds. To the third glass I added a handful of raisins and to the fourth glass big pieces of dark chocolate. 


After everything was ready and the oven was hot I poured the mixture into plastic muffin cups. I filled only 2/3 of the cup (remember that they will grow in the oven and you don't want them to spill out of the cups). 
I've put them in the oven at 180°C for 13 minutes. I was checking every 5 minutes if it's already dry inside by stabbing it with a long toothpick. If the toothpick came out dry that meant the muffin was ready. Just in case after those 10 minutes I left it in the oven for another 3 minutes and then I took it out and left it to cool down. 


 The muffins came out really soft inside. The plain muffin can be eaten with butter and is great for tea-breaks. It has a very neutral flavour so it can be eaten with something sweet or with something salty. 
The coconut muffin didn't come out the way I planned as it actually tasted like a plain muffin. As I wrote before more coconut shreds are needed for this muffin. It still came out delicious though ! 
The raisin muffin is the sweetest. Great with strong coffee. 
Dark chocolate muffin is my favourite. Sweet with big pieces of dark chocolate that just melts in your mouth. I think it's great for meetings with friends for a coffee or as a small homemade gift when visiting someone. 


Hope you'll try to make them cause they're really easy , very quick and super delicious. 


Have fun, 

Butterfingered Chef

Sunday

Sweets That Made Me Die and Go To Paradise


Can you find those delicious sweets I'm writing about today ? 


I've seen it a lot of times but I never wanted to try it. My friend had a dirty keychain that looked like it and I think that was one of the reasons why it was on a no-no list. Besides, it looked like food made out of Pokemons. I always thought it would be squashy and sweet beyond boundaries but... I was wrong and it became my favourite sweet with a first bite. 

Yes, I am talking about macarons


The term 'macaron' is derived from the Italian word 'macarone' which means meringue. 
It should not be mistaken with macaroons. Macaron's main ingredients are eggs whites, icing sugar, granulated sugar, ground almond or almond powder and food colouring while macaroon's main ingredients are just almonds and egg whites. 

Macarons were brought to France by Catherine de’Medici. She was a daughter of a Duke of Urbino and a brief ruler of Florance, Lorenzo di Piero de' Medici. He died from syphilis 21 days after Cathrine's birth at age of 26. Her mother was Madeleine de la Tour. Catherine married King Henry II of France in 1533 at age of 14 and brought with her Italian pastry chefs who introduced macaron to France. 


Just a few days ago I tried my first macarons which after today I don't even consider a macaron but a "wanna-be". Macarons are very popular all over the world but it is difficult to find the good ones. A lot of macarons are just different colours but do not taste like what they are suppose to be made of. A lot of them do not have a flavour what so ever; they're just really sweet and no matter what colour you're going to buy it will not taste like anything else than just sugar. Also a lot of them don't even have the right consistency. The good macarons are unfortunately really expensive. 

Btw, the beautiful earrings you see in this photo are made by Horsecka Jewelry

The macaron we know today (so called double-decker) was created by Pierre Desfontaines of Laduree in 1930's. His grandfather, Louis-Ernest Laduree, founded  a french luxury bakery, Laduree,  in 1862 which thanks to his grandson's invention became famous all over the world and till today is still one of the best known makers of macarons. 


Everything from Laduree's paper bags, through the packaging to the macarons is classy and sophisticated. The small box of 6 macarons costs 15 euro. A box of 8 macarons 17 euro. The price says it all. 


Rose - at first I just felt its amazing texture, not the flavour. The almond meringue discs are crunchy at first but they really quickly melt in your mouth. The inside is really soft with a creamy, delicate texture. Just when I completely forgot that the macaron is suppose to have a flavour it hit me with such strength that I behaved as if I ate something really hot. The strong taste of a rose appeared first on my tongue and within seconds it was all over my cheeks and then nose. While the aroma was spreading in places I never thought have taste-buds (and I'm still sure they don't) I completely forgot about reality and the fact that I was sitting with my parents in a living-room. I was miles away in my grandparents summer house picking up petals of a wild rose from a garden which later I would mash in a small kitchen with lemon juice and sugar to create rose jam. Surrounded by the aroma of the rose I was 10 again. 
Now I know what I would say if somebody asked me what would be the last thing I would want to eat before I die. Rose macarons because they move my whole body and mind to what I consider my heaven and paradise. 


PistachioThe creamy inside contains small pieces of nuts which gives a nice crunch to the whole macaron. After I ate it I looked at the notes I took while tasting it and I realised that within two sentences I used the word "pistachio"five times, which should give you a really good idea about its flavour. It tastes more like a pistachio than a pistachio itself. 


Pure Origin Chocolate From Venezuela - it tastes like a Polish Prince Polo chocolate bar (dark chocolate version) with a  creamy inside. If you never tried Prince Polo before I bet you can easily find it in Polish shops and if you're from Czech, Slovakia, Lithuania, Ukraine or Iceland you should have no problem in getting one as apparently those chocolate bars are quite popular in those countries. In Iceland it's called "Prins Póló".


Chocolate - Because of this little macaron I literally started screaming asking my mom "What is this chocolate ?! Where do they get it from ?!" because I never ate a better chocolate in my entire life. 


Salted Caramel - Really strong taste. Even though the name of this macaron suggests that the filling was made with an enormous amount of sugar and some salt I didn't taste carmel whatsoever. Instead of that I felt like eating a less sweet version of condensed milk. It reminded me of wafer-cakes my grandma used to make. It also tasted the way a honeycomb smells when taken out of the beehive (at least that's the way I remember the smell of it). 


Raspberry - After the first bite I felt like having a handful of raspberries in my mouth. After a whole macaron I felt like I ate at least 60 raspberries at once. The aroma is really strong and what I like about this macaron are the seeds that I could feel in my mouth and which gave me an illusion of actually eating a raspberry. 


If you ever ate a cheap macaron from a nearby bakery and it wasn't very good or it was just really sweet without any specific flavour please do not think all of them are like that. It can take time to find the good and real macarons. If you'll ever find yourself in Laduree store buy a small box. I know it's expensive but I'm sure you won't regret spending those 15 euros. Just don't get addicted to them! 


Take care sweet-tooth comrades! 

Butterfingered Chef


Thursday

Light up your mood with a Light Pumpkin Soup

Hi ! Having a weird day ? You don't know what you feel like eating ? It's grey outside and the melancholic rhythm of the rain is driving you into depression ? I know what can help you ! 


Pumpkin Soup ! 
It's really light, very healthy and even it's colour will make you feel much better. Shut the drapes, turn the lights on, put some good music on and start cooking ! 

Playlist that will put a smile on your face even before stepping in a kitchen: 

Lucy Spraggan - Last Night 

OK ! Ready ? 


Ingredients : 

For the soup : 

- Parsley (1 Big one or 2 small ones)
- 3 Carrots 
- 3 Small Onions (1 big one)
- 3 Red Peppers 
- Olive Oil 
- Ground Pepper 
- 2 Big Potatoes 
- 3 Pieces of Pumpkin (Like the ones shown on a photo)
- Ground Nutmeg 
- Salt

For crouton :

- Brown Bread (of course it doesn't have to be the brown bread but I think it is the best for this soup)
- Butter (Depending on the amount of crouton you're making)
- Garlic (Depends on the amount of butter)

For serving : 

Apart from crouton you can use sliced almonds, cream cheese (or just cream) and basil. 


First, wash all the vegetables  


Then peel parsley and carrots. Cut of the ends (they're usually bitter).


Chop those carrots and parsley. You don't have to chop them in tiny pieces. Everything is going to be mashed up at the end anyway. The pieces have to be thin enough to soften easily when cooked.


To prepare peppers you have to cut of the top part. This way it's going to be easier to remove the seeds.


Cut the "arms" of the "seed nest".  Now it's going to be easy to just pull out the seeds without much of them falling inside the pepper.


 Told ya ! I've learned that not such a long time ago myself...


Cut the pepper into four pieces and remove all the white bits then chop to approximately 1cm x 1cm pieces.


Peel the onion and chop into similar pieces as the pepper.


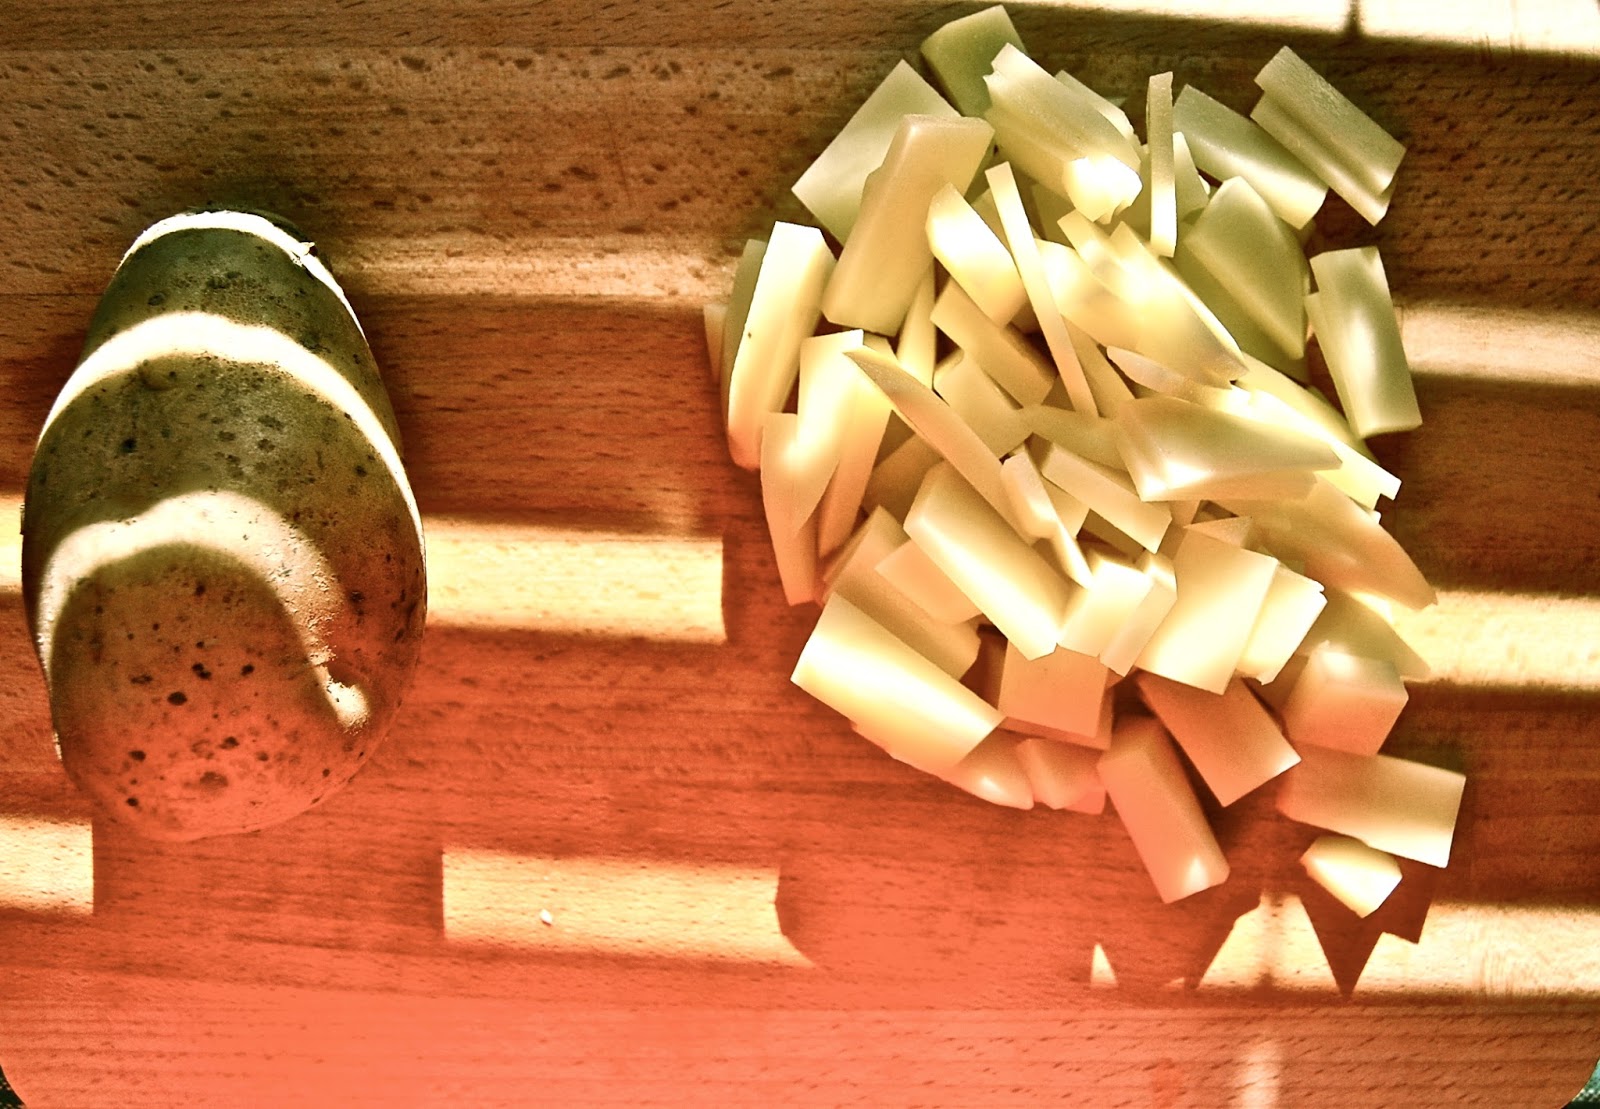
Peel and cut the potatoes.


Fun part ! We're taking the alien out of the pumpkin. With a spoon scrape out the seeds and the flesh of the pumpkin.

I find the flesh really funny because for me it really looks like an alien that had a very bad trip to earth.


That's how the inside of the pumpkin should look after you're done with it. Clean.


Cut the piece in two. (In four if it really big).

Remove the skin. It's best to do it with a normal chef knife. Put the piece of the pumpkin on a flat surface and start removing the skin from the bottom while holding the top. Then flip the piece around and remove the skin from the part you were just holding while holding the already clean part.
.
.
.
I hope that was clear for you...


Chop the pumpkin into quite big pieces. Everything is going to be mashed up so it doesn't matter if they're not going to be perfectly chopped. They have to be a small enough size so they cook easily.


In a massive pot heat up olive oil (use quite a bit).
Throw in the onion and cook until lightly browned (to be save do it on a medium heat so it won't burn when you look away for a spoon).


Add potatoes. Give them 3-4 minutes. Keep stirring all the time until you add the pumpkin.


Add carrot and parsley. Stir.


Add pepper. Stir.


Add pumpkin. Now stir every 3 minutes. After some time you'll see that the vegetables are shrinking and you have more space in a pot.


When you'll see that the pumpkin starts getting mushy add water. Add enough to cover the vegetables. Stir well, cover with a lid, turn the heat up and leave it like that for 10-15 minutes. After this time check on it, stir and do the same (if the soup goes crazy turn the heat down to medium).


Meanwhile cut the bread into 1cmx1cmx1cm squares.


Lay them in a baking tray. (you can also just fry them on a pan)


Depending on an amount of bread melt butter with garlic in a microwave and pour it on the bread. Sprinkle some salt. Stir it well and put in the oven for around 7-10 minutes at 160°C. 


You know your soup is almost ready when all the vegetables are quite soft (soft enough for the blender too). Now it's up to you how salty you want the soup and how much nutmeg and pepper it needs. Keep cooking it over the low heat and slowly add bit by bit of each spice until you get the result you like.


When it's spiced enough mash it up with the blender and voila ! It's ready !

The soup should have a delicate taste. Quite sweet I would say. The pumpkin really does light up the mood. Because it's mashed up it's really good for troubled stomach. The crouton are a nice crunchy touch to the fluffy texture of the soup. 


I hope this soup will make you feel better 
and that making it will only be a pleasure. 


Butterfingered Chef